PROJECT 6
December 2002
MODIFYING M.O MOTOR CASINGS TO ACCEPT MABUCHI MOTORS
Anthony's solution to fitting the Mabuchi motors.
Chris's solution to fitting the Mabuchi motors.
I only had 2 casings and 2 pile motors to work with.
Standard case before beginning.
I recently bought a Dremmel tool. It runs at 10 000 RPM and fine sanders, grinders etc.. can be held in its chuck.
With it I reamed out the front of the M.O case to accept the large brass bush at the front on the Mabuchi motor.
Next, I outlined the diameter of the rear of the Mabuchi motor onto the rear plate of the M.O case and drilled it out.
I used the drum sander attachment to smooth out the edges.

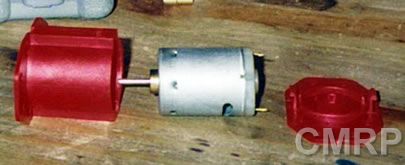
The front and rear of the case reamed out to accept the Mabuchi motor.

The motor press fits into the case and the rear plate snaps on as normal. The rear of the motor protrudes by about +- 3mm.
I have had suggestions about painting the rear of the motor red, but I think it looks fine as is.
As you can see, both methods permanently change the M.O case.
Anthony
Pros : In a model it would be almost impossible to see the mod.
Cons : The motor is longer than standard.
One case needs to be cut up.
Chris
Pros : Good cooling is achieved with the exposed rear.
Cons : The rear plate is slightly weak due to so much material being cut away.
Both work well in my opinion, its just up to you to decide....
The next step is to build up a 4mm shaft.